 A significant amount of the eLearning development I’ve been involved with, from production to project management, has included software training. A key element for that subject is, of course, recording the computer (or mobile device) screen to show the software, introducing the user to the UI and stepping them through the particular process.
There are lots of ways to capture the screen, from still shots to video recordings, some more preferred than others. I’ve compiled my ‘favorite’ list here in hopes it may save you some search time when you encounter such a requirement.
Windows, simple method:
 I’m surprised at how many folks don’t know that pressing the ‘Print Screen’ key (or sometimes ‘PrntScrn’) on their keyboard will take a screenshot. On the other hand, it may not be obvious since nothing ‘happens’ after doing so; you still have to paste the screenshot into something else (i.e. Paint, Photoshop, Word, email, etc). The Print Screen key will capture the entire desktop to an image…
 …which may be excessive if you have a very large, or dual, monitor setup. If you just want to capture the foremost (active) window, press and hold the ‘Alt’ key, then the ‘Print Screen’ key to capture JUST that active window, then paste that more specific capture into the preferred targeted application.
(this works for all Windows OS versions from XP on up to Windows 8. Not yet tested on Windows 10 but I assume the keys work the same on that OS as well)
Windows, software:
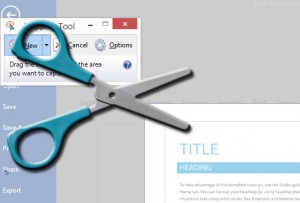
 Included with Windows since version 7 is the ‘Snipping Tool’. You can find it quickly by searching for ‘snipp…’ with whichever version of Windows desktop search feature. While ‘PrntScrn’ is faster, the Snipping Tool offers the advantage of a quick way to highlight an area of the screenshot and save to the system clipboard.
Techsmith’s SnagIt remains a popular option. Newer versions have been upgraded with many features, including video recording, callout styles, and effects – and for a mere $50 (and volume discounts available), it’s worth exploring. However, since MS has included the Snipping Tool, I haven’t worked with SnagIt at all the past couple years.
With that segue into video recording, there are several options. The ones I use the most are some of the most well-known, so maybe no surprises:
Adobe Captivate: As frequent readers may know, this is one of my most preferred development tools. That aside, Captivate remains a solid tool for more-simple screen capture and recording needs. However, it’s also a bit overkill if you’re not using the screenshots and recordings as the base for a full eLearning project.
Techsmith’s Camtasia: If I need to create a quick video demo, this is my go-to software. It’s full-motion capture quality is among the best available, and its included libraries of effects and callouts help create an engaging end-product. I rarely produce simple videos with Premiere anymore when Camtasia is an easier and robust tool.
Articulate Storyline: I admit to being a bit behind on this software, despite the glowing reviews it has. It’s recording features are pretty solid, allowing a bit more flexibility than Captivate’s editing features. I wouldn’t default to it for screen recording given my experience with Captivate and Camtasia, but it’s certainly just as viable a solution.
CamStudio – was on my top-list a couple years ago; fairly quick, reliable, and FREE. But it doesn’t seem like it’s been updated in a while and, when I used it, it only output to SWF. I hear it was updated to output to MP4 but a bit unreliably. If you’ve used it recently with success, I’d love to hear your experience, especially if the MP4 output is solid.
Mac OS
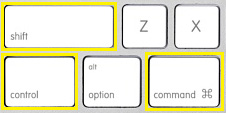
 Macs also make screenshots pretty easy with a variety of built-in key combinations. Generally, it’s a mix of the Command, Shift, and 3 or 4 keys, and sometimes the Control key too.
![]() This website does a great job of explaining the six different options, so I’ll leave the details to them…
This website does a great job of explaining the six different options, so I’ll leave the details to them…
Hey, Adobe Captivate and Techsmith’s SnagIt and Camtasia are both available for Mac OS platforms! Same caveat – a bit overkill for simple screenshots but great tools if you want more advanced features and publishing options.
Otherwise I see little reason to use much more than Quicktime, as long as you have Snow Leopard or later. Not as many features but certainly a simple, solid way to do screen recording on a Mac.
Android:
One of the constant issues with Android devices is the different ways device manufacturers tweak and implement the software. On most Android phones, pressing ‘Power’ and the ‘Volume Down’ buttons at the same time – and hold for a second or two. This can be tricky but, when it works, results in a clean screen image, usually located in the Gallery section/app.
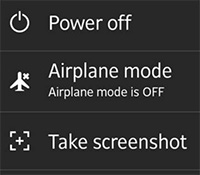
However, some manufacturer’s make it easier – Sony, for example, puts it in the Power Dialog… I wish my phone did that!
iOS:
In most cases, pressing the ‘Sleep/Wake’ button (at the top of the device) and the ‘Home’ button at the same time will result in a screen capture, most often saving it in the Photos section/app.
Finally, here are some guidelines:
Regardless of the method you use for taking a screenshot, on whatever device, keep in mind context and size. It’s important to not only show all relevant pieces of the software (i.e. just pointing to the ‘setting’ menu may not be helpful if the user doens’t know WHERE the ‘setting’ menu is located) but also to ensure the capture is clear and readable. Size your windows appropriately, crop where necessary, and use highlights and callouts wisely so the user knows where to look.
When it comes to screen recordings, format is just as important as size. These days, output to MP4 is pretty much a requirement. If the tools your using only publish to AVI, or SWF, or FLV – time to find a new tool. Then balance the dimensions of the video with what you need to show and the delivery. If you have a streaming video server on the backend, you can probably source a large, full-framerate video. If you’re delivering ‘standard/progressive’ video, avoid video over 800px wide, push the framerate down to 15fps if possible, and – for goodness sake – keep your videos below 10 minutes.
If you’re looking for even more optios, or perhaps an alternative writeup, check out:


Nice roundup, Erik!
Thanks Tom, always appreciate a comment, and privileged to have a moment of your eyeballs 🙂